If you’re looking for IMAP support (lots of search terms suggest this post is getting a lot of traffic for this) then you can just use the same IMAP details you do for Gmail (see here). Inbox is just another frontend onto your Gmail account, you can even switch between the two as you like!
Google recently launched Inbox by Gmail. Like all new Google Products, if you’re a Google Apps user (whether it be a legacy free account, or as a paying business), you’ve been excluded with no indication from Google for how long.
After much faffing about; I was able to set Inbox up to work with my Google Apps account; including:
- Emails sent to my Google Apps address show up in Inbox
- Replies sent from Inbox show my Google Apps address as the sender
- Replies sent from Inbox show up in the Sent folder in my Google Apps account
In theory; this should work with both Google Apps accounts and any other email account that you can access via IMAP/POP and SMTP.
You will need
- A Gmail account that has been invited to Inbox
- An email account you would like to use with Inbox that is not a Gmail account that you have IMAP/POP and SMTP access to
Step 1: Forward your email to the Gmail account
If you’re using a Google Apps account, this is done in Settings -> Forwarding and POP/IMAP. If you’re using a non-Google account, this may vary. If forwarding from a Google Apps account, your Gmail account will be sent an email to click to confirm the address.
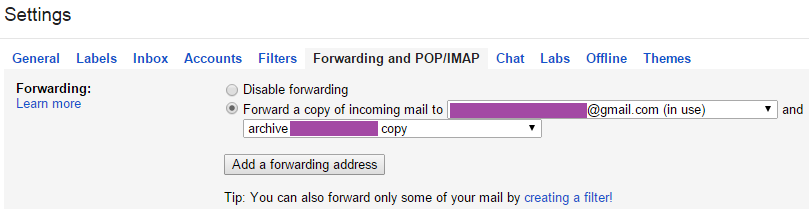
With this done; new email sent to you will turn up in Inbox.
Step 2: Set up your outgoing email address in Gmail
Login to your Gmail account, and in Settings -> Accounts and Import you’ll need to set up a “Send mail as” address for your primary email address.
Be sure to tick “Send as Alias”; as this will stop Inbox from including yourself in the To field of all replies.
It is important that you choose the option to send mail through your own SMTP server. If using a Google Apps account; you’ll want to use:
- Server: smtp.gmail.com, Port: 587
- Username: Your full Google Apps email address
- Password: Your full Google Apps email password; or if you have two-factor auth on, an Application-Specific password
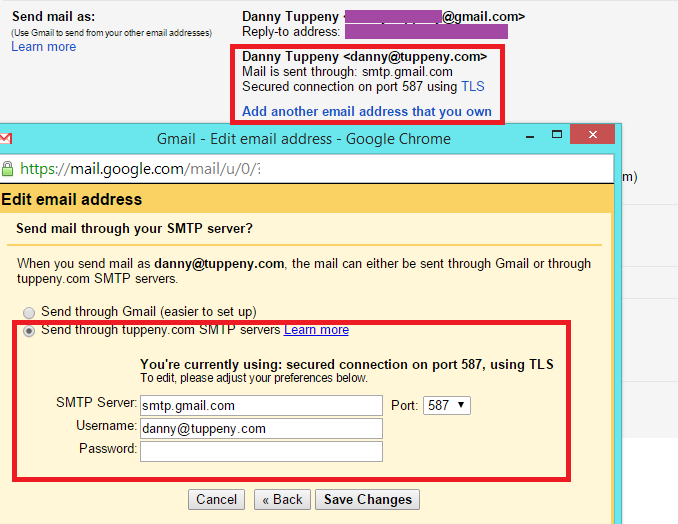
This allows your Gmail account to send email via your primary accounts SMTP server.
Step 3: Mark your new outgoing address as default

This will ensure any new emails you create in Inbox (with the Compose option) will come from your primary email address.
Step 4: Ensure replies are sent from the email address that received them
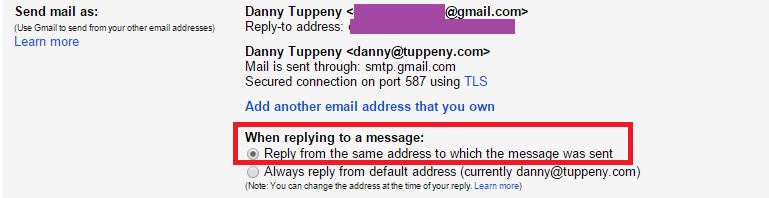
This will ensure when you reply to an email in Inbox, the senders address is set to the same outgoing address that it was addressed to (and in the case of your primary email account, that means the email is sent via the configured SMTP server, which is what causes it to show up in the Sent folder of your Google Apps account).
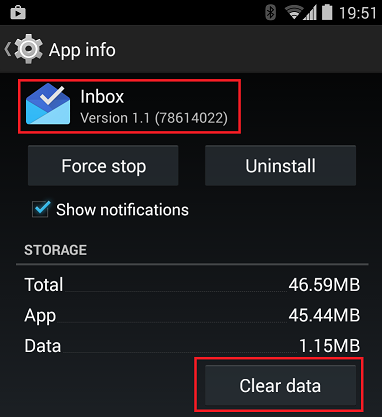
Step 5: Clear your Inbox by Gmail app data
This step might be important. I didn’t do this the first time I tried this; and Inbox didn’t honour my outgoing email address settings (I believe it had cached the fact that I didn’t have any alternative outgoing email addresses). After clearing the data; Inbox correctly let me pick the outgoing email address, and defaulted using the settings I’d set above.
Enjoy!