I was recently sent some Grove components by Seeed to review:
- Grove Shield for Arduino Nano
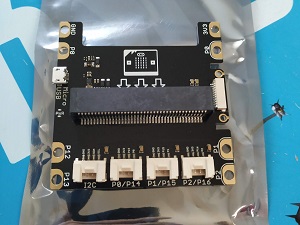
- Grove Shield for micro:bit v2.0
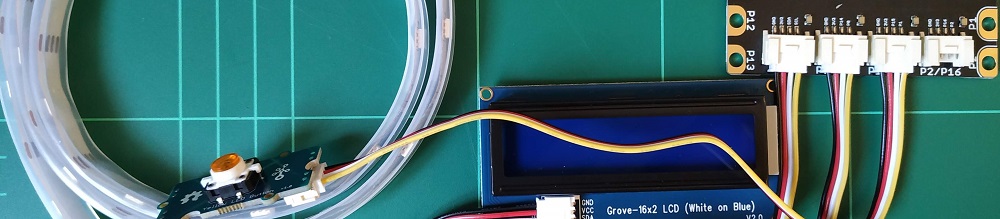
- Grove - 16x2 LCD (White on Blue)
- Grove - WS2813 RGB LED Strip Waterproof - 30 LED/m - 1m
- Grove - Universal 4 Pin 20cm Unbuckled Cable (5 PCs Pack)
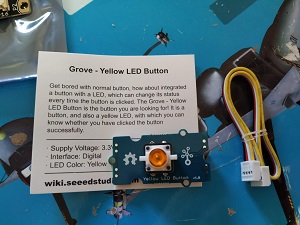
- Grove - Yellow LED Button
These components normally total around $30 USD but were provided to me for free to review. I intend for my review to be honest and unbiased (and I am not part of any affiliate/commission scheme).
Grove modules use an (open source) standardised connector and there are shields for many types of boards (Raspberry Pi, Arduino, micro:bit, NodeMCU, Beaglebone, etc). Coincidentally, I was aware of (and interested in) Grove prior to being contacted by Seeed. Although I like tinkering with Pi and Arduino (there’s something fun about software interacting with hardware you don’t get from just software dev), I always found wiring up components on a breadboard (and soldering) a drag. Anything that makes this plug-and-play so I can focus on the idea/programming definitely gets my interest. Since my son also has a micro:bit and there’s a micro:bit shield, I could also pretend that this was totally for him and not at all for me :-)
Shipping from SeeedStudio
It took 10 days from placing the order to my items arriving. I was expecting it to take longer (the website says the products were coming from a China warehouse) but it’s possible my shipping selection (the cheapest) was upgraded.
Packaging
The items arrived well protected in a box padded with bubble wrap. Each item was also in its own packaging (most in resealable bags). Each component also came with a Grove cable (I hadn’t realised this, so had requested a set of them that it turned out I didn’t need).

LED Button
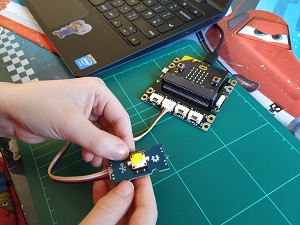
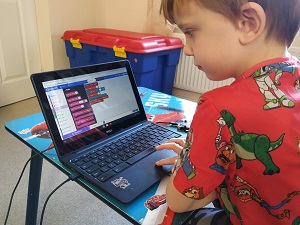
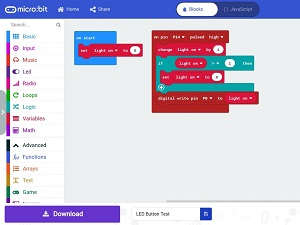
Since these components were “for my son” we started off with micro:bit. The LED button seemed like the simplest component to try out, so we plugged the micro:bit into the shield, the LED button into the shield (P0/P14 port) and then used MakeCode for micro:bit (running on a Chromebook) to make a simple program that would toggle the LED when the button was pressed. It wasn’t obvious to me which pin was connected to the LED and which to the button (even after examining the board) so we had to guess (which we did correctly - P0 was the LED and P14 was the button).
No surprises, this worked as expected. The button feels solid with a nice click as you press it. The button/LED sticks out from the board enough that it should be easy to mount inside a 3D-printed case (or similar) with just the button accessible, though you’d need a little space around it to account for the board and the connector. The LED is bright enough that you could easily see it illuminated in our reasonably bright room.
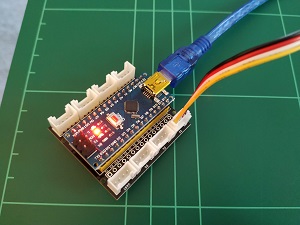
I later connected the button to an Arduino Nano via the Nano shield and again it functioned exactly as you’d expect.
LED Light Strip
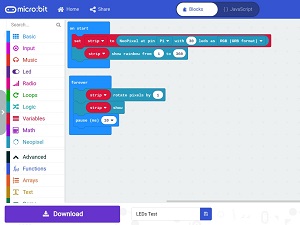
Next up, more LEDs! Having not used a light strip before, I expected this to be less straight-foward (since we’re controlling many LEDs and colours from a single pin). I was aware that MakeCode had support for “extensions” but hadn’t checked in advance if there was an extension for this. Unaware of what the protocol was (turns out it’s a pretty standard RGB WS2813 - mentioned in the product name!) I saw a NeoPixels extension so decided to give that a go in the hope it was compatible.
We made a simple program to rotate some colours along the strip and to my surprise it just worked as expected out of the box (yay for standards!). These LEDs are also bright enough that they were clear in our fairly bright room. They updated quickly, and all the colours we tried came through clearly. The light strip is inside a plastic surround and is very flexible. It’s advertised as waterproof though we didn’haven’t tested this out yet.
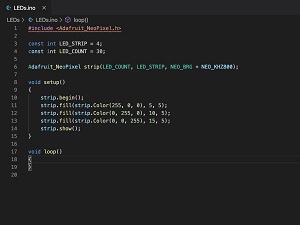
Again, I later connected this to my Arduino Nano and using the Adafruit_NeoPixel library I was quickly able to control the LEDs. The only niggle was that some colours were incorrect until I passed NEO_BRG + NEO_KHZ800 when creating the light strip which looks like the frequency of updates and the order of the RGB values (which actually seems like the opposite order of the colours to the micro:bit extension).

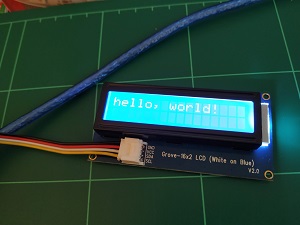
16x2 LCD Display
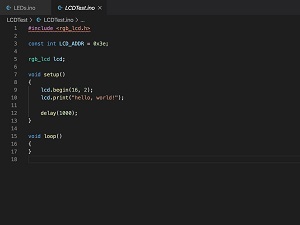
The LCD Display is where we hit our first issue. There are some LCD display extensions for micro:bit, but after much testing we’ve been (so far) unable to make any of them work (if you can, please let me know!). The Seeed wiki says the I2C address of the display is 0x3E (62) but we tried enumerating all addresses from 1 to 150 but were unable to get the display to show anything.
To check the screen wasn’t faulty, I connected it to the Arduino and using the rgc_lcd library and with two lines of code the screen was showing a message (I actually forgot to set the address, so the screen must’ve been using an address that the library used by default).
The screen is clear and bright, and also sticks out from the board enough that it should be easy to mount inside something like a 3D-printed box and look good. It’s very slightly inset from housing but Seeed have some screens without a housing like this if you’d prefer the screen right up against your own housing (like this one).
Build Quality
All of the items received feel high quality and well made. My Arduino boards/components are a mix of super-cheap from eBay (which often turn up in plastic bags with broken pins and badly aligned components) and some slightly more expensive from Amazon sellers (which are much better and often packaged/protected individually). The Seeed components feel on-par with the better quality items I’ve bought.
Value for Money
I think most of the components I received are reasonable value for money for the quality. The LCD screen and LED strips are $5.95 and the combined LED/button is $2.45. I’ve certainly bought components cheaper, but they have been of significantly worse quality (and didn’t have Grove connectors). The micro:bit shield was the only item that seemed a little expensive for what it was at $9.90 (versus $2.60 for an Arduino Nano shield for example).
Would I Buy Them?
If I hadn’t been sent these components for free, would I have paid for them? For the listed prices - and now knowing what I’d be getting - I think I would. The cost would’ve been around £21 GBP (plus shipping) which I think is fair given the quality of the components, the fun the kids have already had using them in MakeCode and how easily I can use them myself in Arduino without having to mess around on breadboards. Connecting things on breadboards might not be particualrly difficult, but it can take time and is easy to wire things up incorrect (and diagnosing issues with wiring can often take time).